|
Aquabot Repair: How to Replace the MotorAquabot Motor Repair. Photos of the motor, Motor oil Aquabot Repair: Replacing the Motor. This can be a big Aquabot repair job if you have no experience removing and replacing other, less difficult Aquabot parts. It can certainly be done by the uninitiated, however take time to protect the loose parts. Newer Aquabots have hard wired motors that require butt connectors and MARINE heat shrink tubing. Marine grade tubing has a glue lining that makes the connection watertight. Tools: Philips screwdriver, flat slotted screwdriver, Small socket set or nut-driver set for the electric terminal nuts. First surgical procedure? Read
this primer.(opens new window)
Let’s get started 1. Remove the filterbag and turn the robot upside-down. IF YOUR MOTOR HAS ONLY THE TOP 2 SCREWS, SKIP TO STEP 4 2. Remove the sideplate, wheels and drive belts on the motor side. The bushings are resting on posts attached to the sideplate. Bushing are placed either inside or outside the sideplate if "C" clips are used. Keep the plate bushing side up and the parts won’t fall off. 3. Ask yourself, “where are the wheel bushings that fit over the wheel end into the slot on the side plate?” 4. Remove the pump, Aquabot Repair: DO NOT remove the long screws from the bottom of the pump before planning for oil spill.DO NOT remove the screws from the bottom of the pump. These screws are holding the pump together. Removal of these long screws holding the pump together could create an oil spill in your robot. The screws to remove the pump are under the outlet cover on top of the robot. disconnect the power cord from the motor terminals.
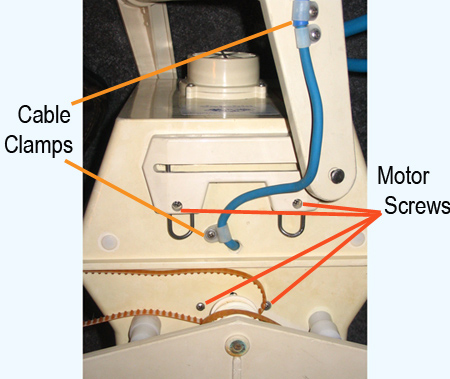
5. Unscrew the two or four motor screws from the outside of the housing. Remove the motor.
6. Install the motor. Be certain the power cord is in the cut out between the motor and housing. 7. Install the pump. 8. Hook up the wires from both pump and power cord. Pack well with the saved putty. Screw on the terminal plate. Newer Aquabots have hard wired motors that require a butt wire splice connector and marine heat shrink tubing. MUST use marine grade tubing. This shrink tubing is lined with glue for a watertight seal. 9. Reinstall the drive belts, wheels and sideplate. 10. plug in the power cord to test your work. Do not run the motor more than a minute unless the robot is submerged in water. If you need a motor or other parts, visit Aquaquality Pools and Spas, Inc. |